OpenStack Cluster with Synology iSCSI Backend Storage

Most OpenStack storage guides jump straight to Ceph. That is the right answer for production, but it is a lot of machinery for a lab. If you already have a Synology DSM box, there is a much lighter option: Cinder ships an in-tree driver for Synology (SynoISCSIDriver) that creates one iSCSI LUN per volume. In this post I connect a multinode Kolla Ansible deployment to Synology DSM over iSCSI, with two storage paths and multipath, and boot instances from Synology-backed volumes.
How Cinder talks to Synology
The driver works with two kinds of traffic, and it helps to keep them apart in your head:
cinder-volume ──── HTTPS :5001 ────▶ DSM WebAPI      (control: create / delete LUN + target)

compute node  ──── iSCSI  :3260 ───▶ DSM iSCSI target (data: the instance's disk I/O)
Every time you create a volume in OpenStack, cinder-volume logs in to the DSM WebAPI and creates an advanced file LUN plus an iSCSI target inside a DSM volume. When you attach it, the compute node logs in to that target directly, and the LUN shows up as a block device for the instance. Once a volume is attached, cinder-volume is no longer in the data path.
Read this before you build anything on it.
- The driver documentation targets DSM 6.0.2 or later. DSM 7 renamed iSCSI Manager to SAN Manager, and the driver docs do not explicitly promise that every API still behaves the same. Test with one volume before you build anything else on top.
- A single DSM box is a single point of failure. Two network paths protect you from a broken link, not from a dead DSM.
- The Synology driver does not support active/active. You run
cinder-volumeon exactly one node.
Example environment
The lab runs as VMs on a single Proxmox host, which is why the numbers below are small. Replace the addressing with your own.
| Item | Value |
|---|---|
| OpenStack | 2025.1 (Epoxy), deployed with Kolla Ansible |
| Networking | Neutron ML2/OVN |
| OS | Ubuntu 24.04 on every node |
| Storage backend | Synology DSM 7.x (a VM using the Arc loader) |
| Deployment host | An existing jump host at 192.168.19.30, on the management network only |
Nodes
| Hostname | Management | Tunnel | Storage 1 | Storage 2 | External | CPU | RAM | Disk | Additional disk |
|---|---|---|---|---|---|---|---|---|---|
dev-ubuntu24-deployer | 192.168.19.30 | none | none | none | none | 2 vCPU | 4 GB | 30 GB | none |
dev-synology-central-storage | 192.168.19.31 | none | 172.16.2.31 | 172.16.3.31 | none | 2 vCPU | 4 GB | 51 GB | 5 x 200 GB |
dev-openstack-controller-01 | 192.168.19.36 | 172.16.1.36 | 172.16.2.36 | 172.16.3.36 | yes | 4 vCPU | 8 GB | 128 GB | none |
dev-openstack-controller-02 | 192.168.19.37 | 172.16.1.37 | 172.16.2.37 | 172.16.3.37 | yes | 4 vCPU | 8 GB | 128 GB | none |
dev-openstack-controller-03 | 192.168.19.38 | 172.16.1.38 | 172.16.2.38 | 172.16.3.38 | yes | 4 vCPU | 8 GB | 128 GB | none |
dev-openstack-compute-01 | 192.168.19.41 | 172.16.1.41 | 172.16.2.41 | 172.16.3.41 | none | 8 vCPU | 16 GB | 128 GB | none |
dev-openstack-compute-02 | 192.168.19.42 | 172.16.1.42 | 172.16.2.42 | 172.16.3.42 | none | 8 vCPU | 16 GB | 128 GB | none |
All subnets are /24. Every OpenStack node has five NICs: management, tunnel, storage 1, storage 2, and a fifth NIC for the external network. That fifth NIC has no IP, because Neutron takes it over and turns it into br-ex. The Synology VM has three NICs: management (admin and internet access), storage 1, and storage 2.
The VIP for the OpenStack APIs is 192.168.19.35, held by HAProxy and Keepalived on the controllers.
Networks
The tunnel and storage networks are internal only, with no gateway.
| Network | Subnet | Used for |
|---|---|---|
| Management | 192.168.19.0/24 | APIs, SSH, DSM web UI, the VIP |
| Tunnel | 172.16.1.0/24 | Geneve overlay traffic between nodes (tenant networks) |
| Storage 1 | 172.16.2.0/24 | WebAPI calls, iSCSI path 1, and the Glance NFS share |
| Storage 2 | 172.16.3.0/24 | iSCSI path 2 |
| External | 192.168.19.0/24 (flat) | Floating IPs, on the fifth NIC of each controller |
Each node uses the same last octet on every subnet (for example .36 on controller-01), which makes it easy to tell which node an address belongs to. DSM has an address on both storage networks: 172.16.2.31 and 172.16.3.31.
Both storage networks are software bridges on the same Proxmox host. The multipath failover in this post therefore trains the logical path failure (a NIC going down inside a VM), not a real physical NIC or switch failure.
Step 1: Prepare DSM
Storage and network
Everything in this section happens in the DSM web interface. The network comes first, so every service you enable afterwards can be bound to the right NIC.
-
Give DSM a static IP on each storage NIC. Open Control Panel → Network and set
172.16.2.31/24and172.16.3.31/24on the two storage adapters. Leave the gateway empty on both, because these networks only carry storage traffic. Two separate subnets (instead of two addresses in one subnet) keep routing unambiguous and give you two independent iSCSI paths later.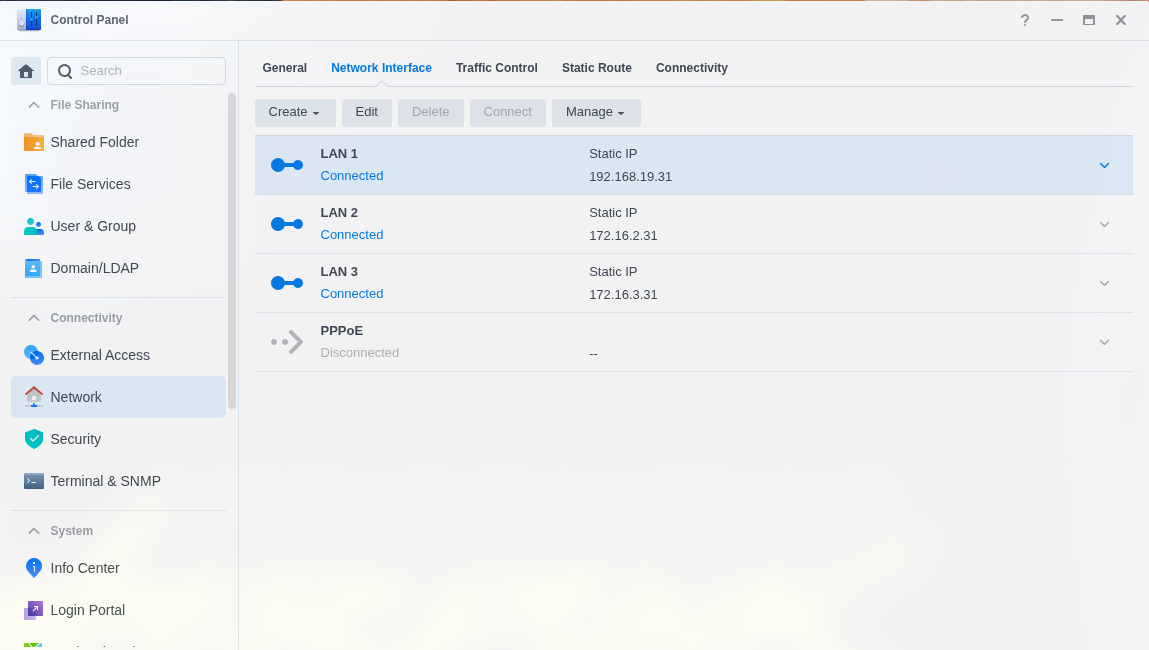
-
Create a storage pool and a volume. In Storage Manager, create a pool and then a volume on top of it. Choose Btrfs, because thin-provisioned LUNs and snapshots generally need it. Write down the volume name (for example
volume1). That exact name becomessynology_pool_namein the Cinder configuration.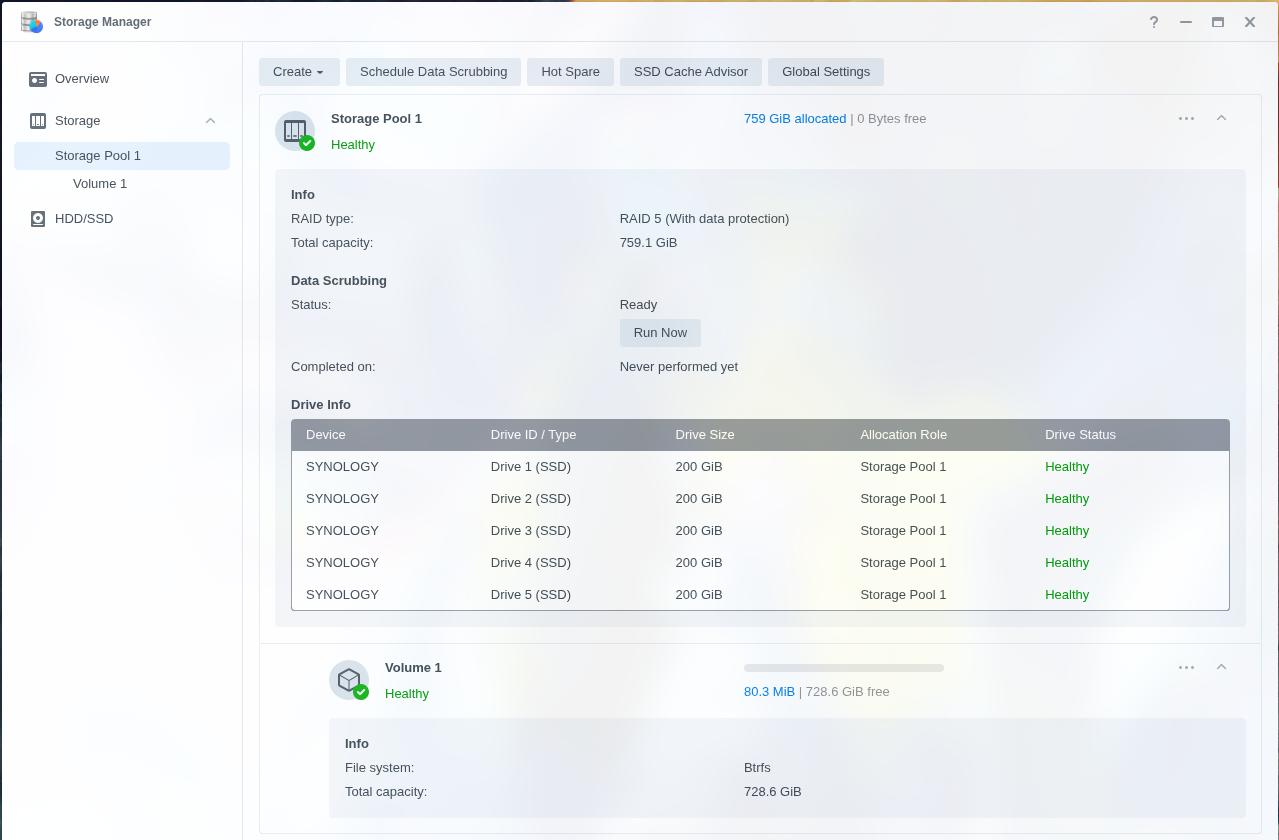
-
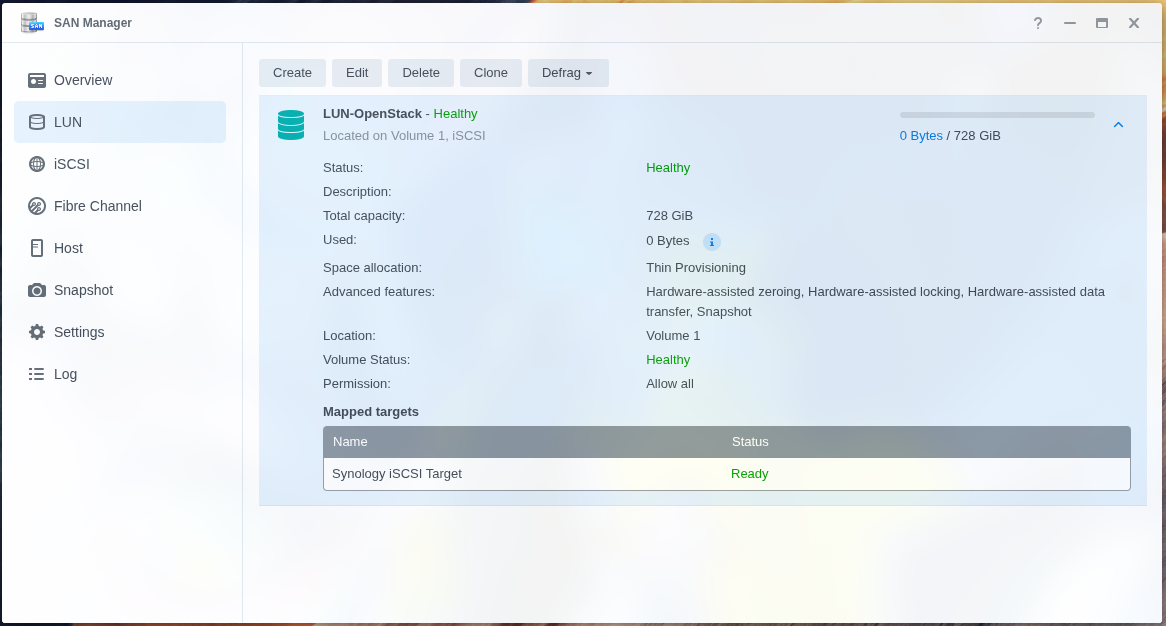
Create a LUN (optional). In SAN Manager, create a LUN on the new volume. The Synology driver creates and deletes LUNs by itself, so Cinder does not need this step. A manual LUN is still handy to confirm the volume can host LUNs at all, and it is the starting point if you ever use the fallback of one big LUN with LVM on top.
-
Create an iSCSI target (optional). Create a target and map the LUN to it. Like the LUN, this is only for testing: you can log in to it with
iscsiadmfrom a node to prove the data path works before Cinder is involved. Later, the targets that Cinder creates have names starting withCinder-Target-.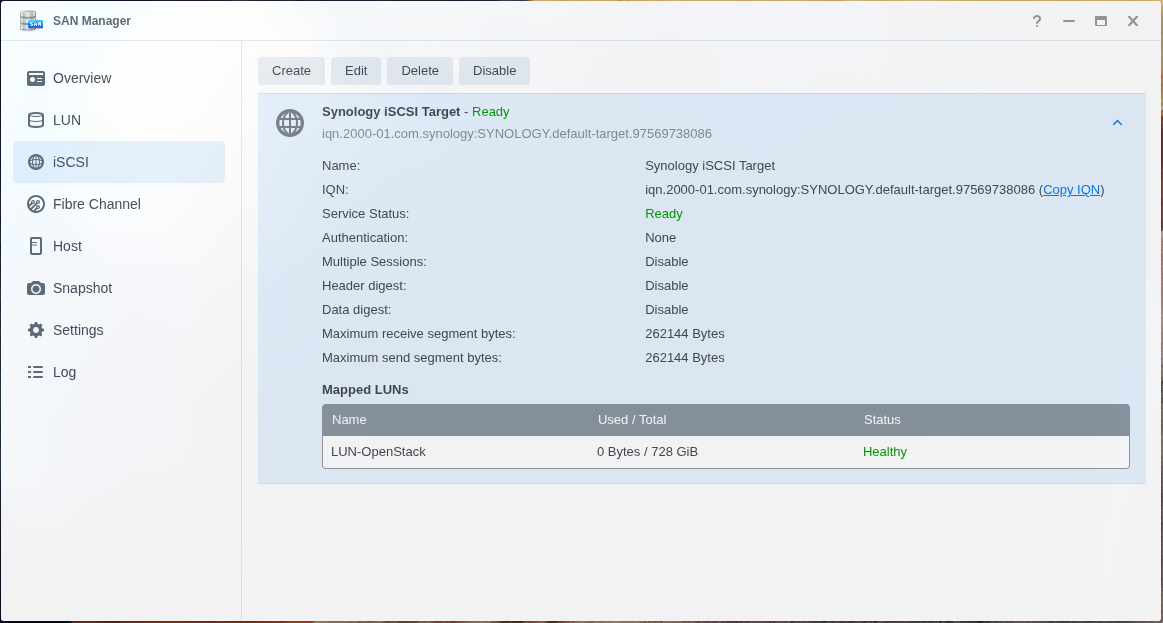
-
Bind the iSCSI service to the storage NICs. In the iSCSI network binding settings, allow the service to listen on the two storage interfaces only. This makes both portals (
172.16.2.31and172.16.3.31) visible to initiators, which multipath depends on, and keeps iSCSI off the management network.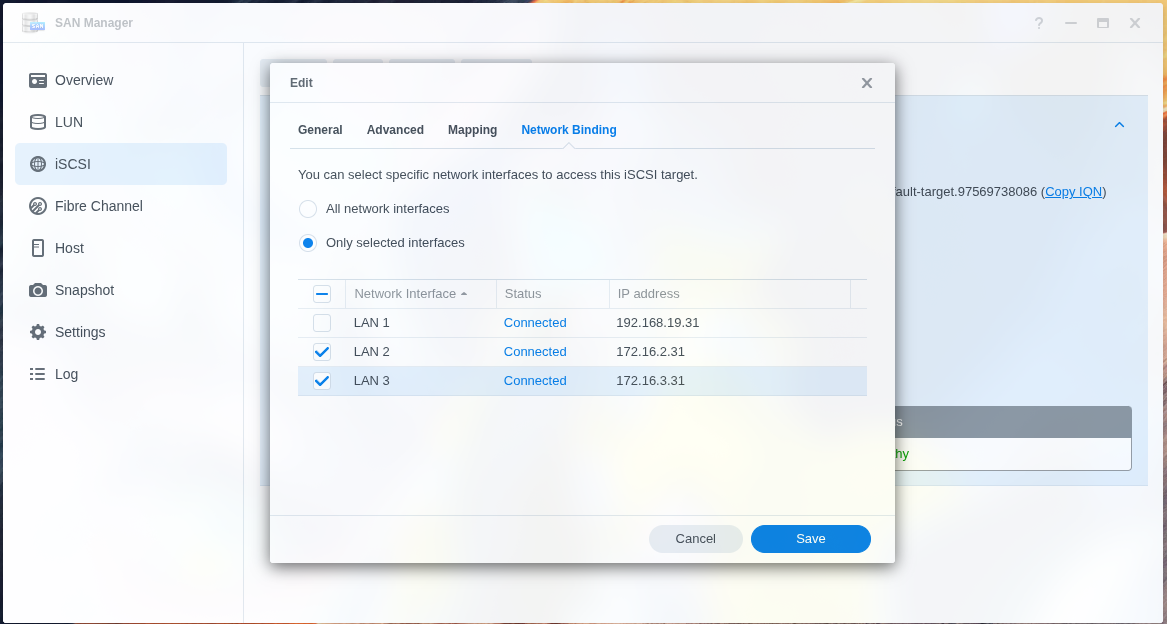
-
Enable the NFS service. Block storage is not the only thing worth sharing. OpenStack's image service (Glance) stores images as plain files by default, so each controller only sees the images it received itself. An NFS share that every controller mounts fixes that. In Control Panel → File Services → NFS, enable the service and set the maximum protocol to NFSv4.1, which needs only port
2049.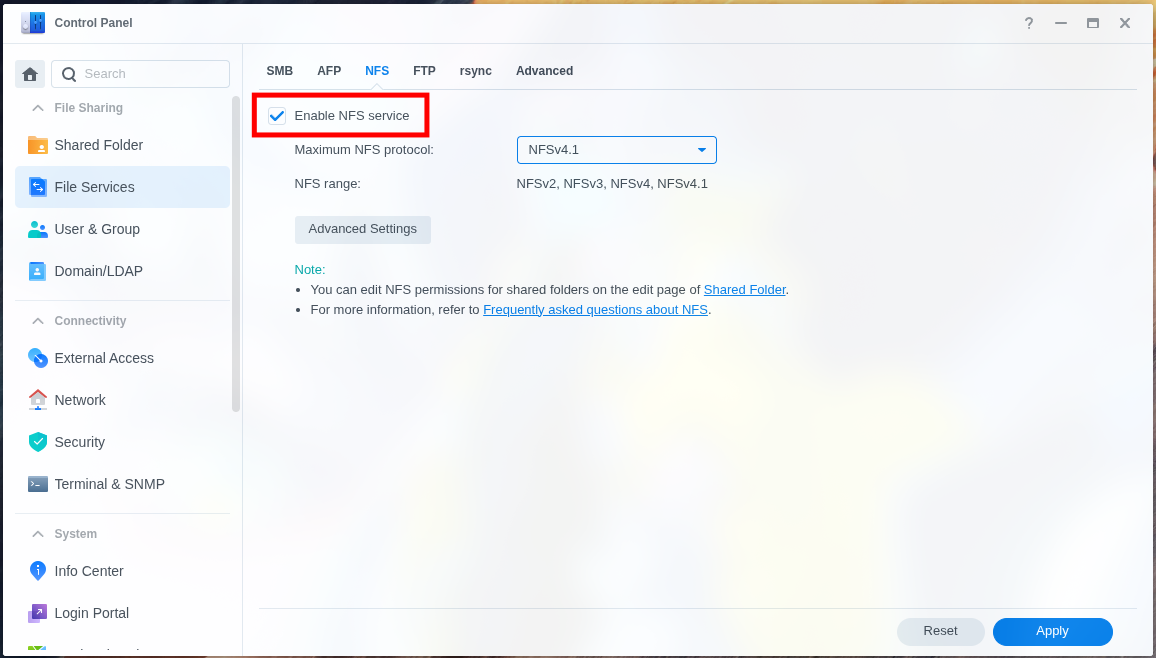
-
Create a shared folder. In Control Panel → Shared Folder, create a folder named
glanceon the volume from step 2. Its path on DSM is/volume1/glance, and that is what the controllers will mount. The recycle bin and encryption can stay off for an image store.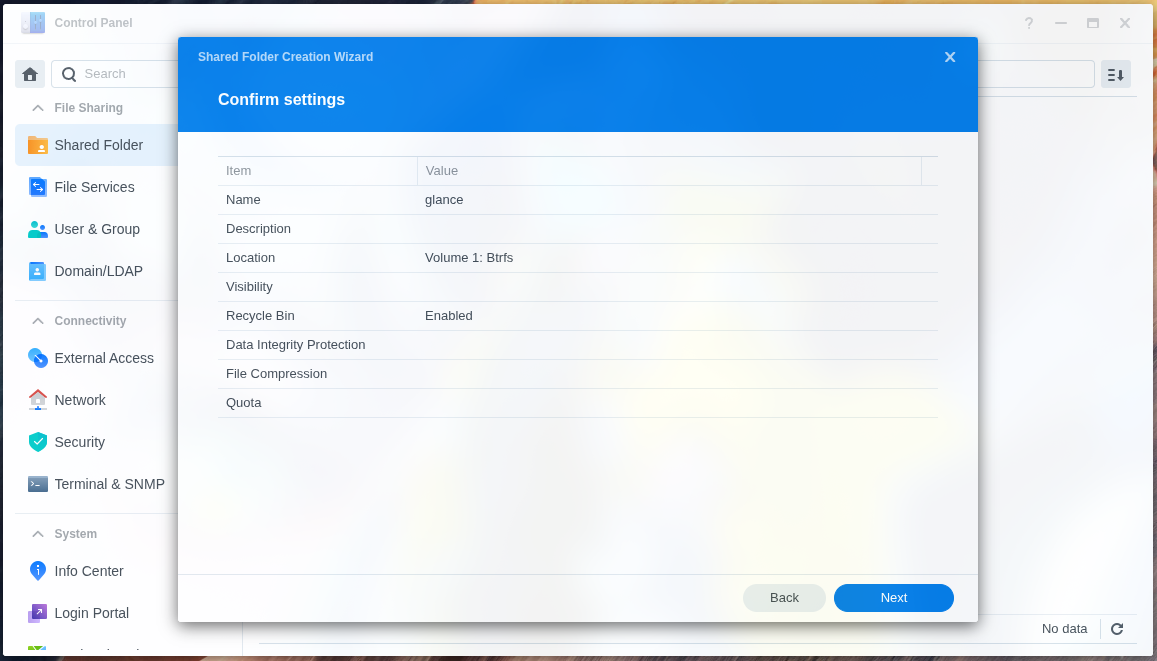
-
Grant permissions. Give Read/Write on the shared folder to the accounts that will touch the files, in my case the
guestandopsusers. Then add an NFS permission rule for the storage subnet (172.16.2.0/24) with Read/Write. Set squash to No mapping, otherwisechownfrom the controllers is silently remapped and Glance can hit permission errors.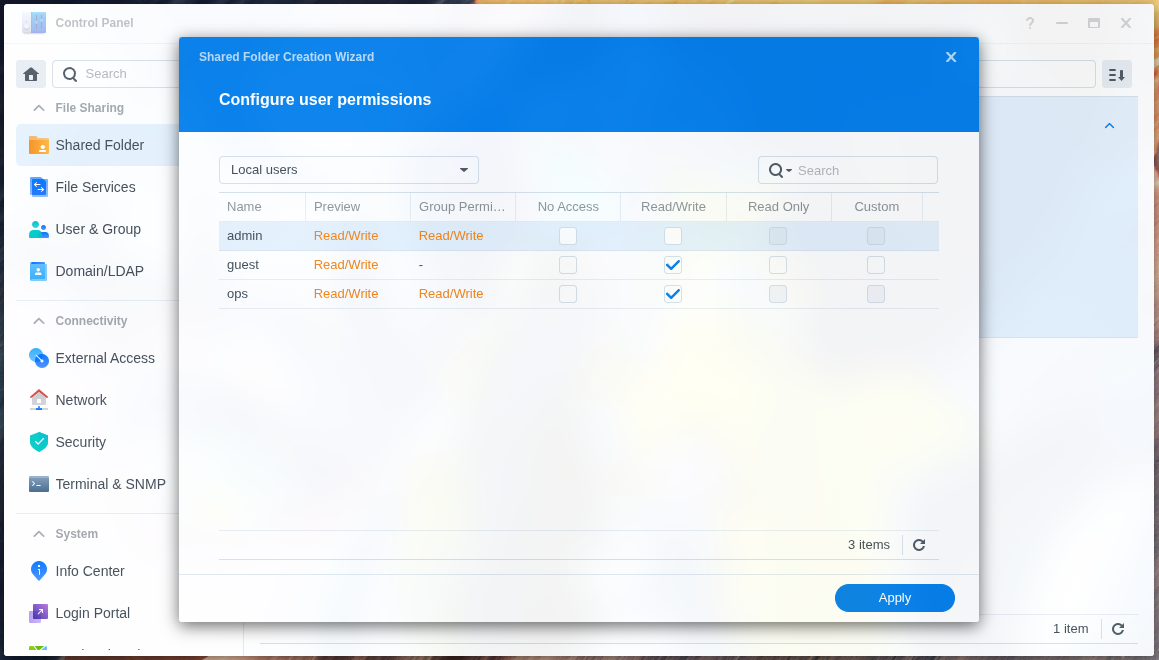
-
Bind NFS to the storage network. Restrict the NFS service to the storage interface, the same way as for iSCSI. NFS is then only reachable from the storage subnet, not from the management network, and the DSM firewall only needs to allow port
2049from the controllers.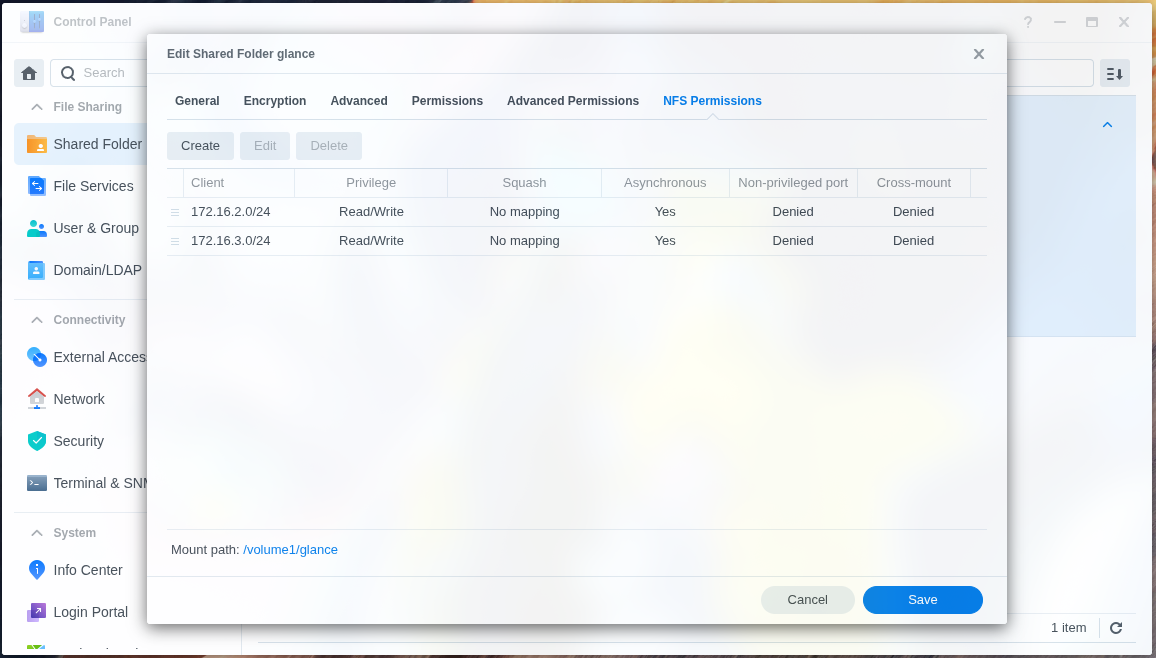
The service account
The driver logs in non-interactively with a username and password, so the account it uses cannot have two-factor authentication. In my lab I did not create a dedicated Cinder user. I reused ops, the first account I created on DSM, because I already mapped its permissions for the shared folders and did not want to repeat that work for a second account.
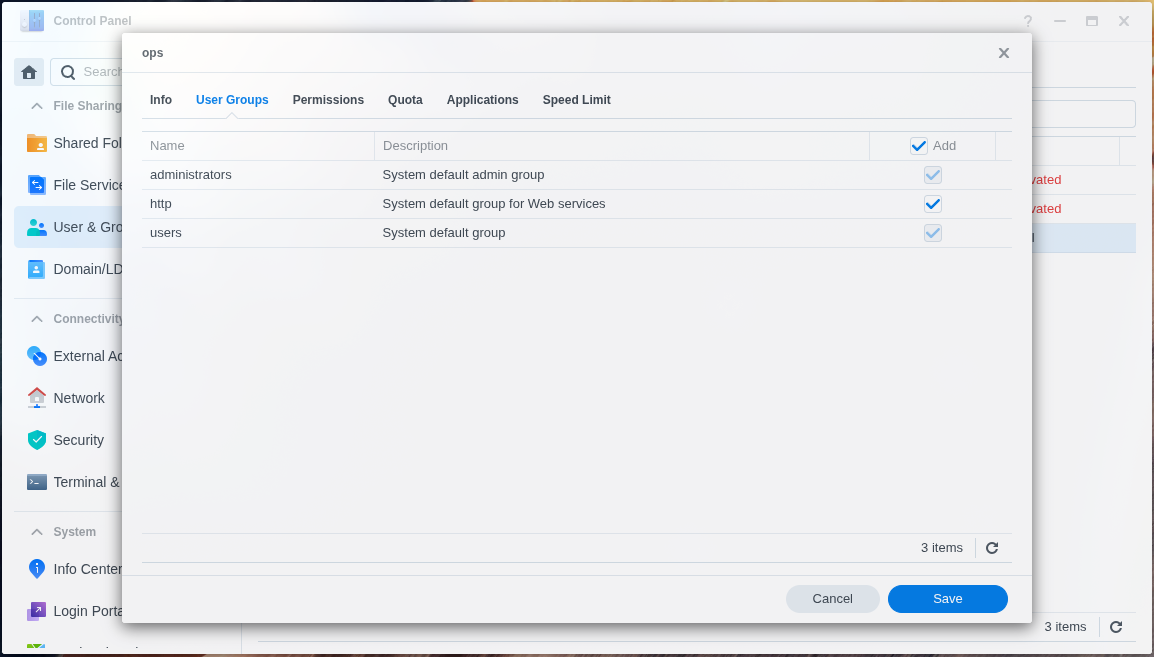
- Control Panel → User & Group: add
opsto theadministratorsgroup. The driver needs admin rights to create LUNs and targets. Without this, volume creation fails. - Control Panel → Security → Account → Two-factor authentication: make sure enforcement does not cover
ops. If enforcement is set to all users or to the administrators group, scope it to a specific group and keepopsout of it. - Use
opsassynology_usernameincinder-volume.conf.
This is the lazy path, and it has a cost. ops is now an admin account without 2FA whose password sits in plain text in cinder-volume.conf. Anyone who reads that file gets full admin on DSM, including the glance share and everything else ops can touch. A dedicated account limits that blast radius, and I would create one for anything beyond a lab.
Because of that, lock the account down at the network level. In Control Panel → Security → Firewall, allow:
- port
5001only from the OpenStack nodes on Storage 1, - port
3260only from the OpenStack nodes on both storage subnets, - and deny everything else.
Also use a long random password for ops, and keep cinder-volume.conf at chmod 600 and out of git.
The driver also supports a synology_device_id option (a trusted-device token that skips the OTP prompt), which lets you keep 2FA on an account. The token is tied to that account and breaks if its password or 2FA is reset, so a dedicated service account is usually cleaner.
Test from a controller
Run these from the node that will host cinder-volume, because that is the exact path Cinder will use.
# iSCSI portals on both paths
nc -zv 172.16.2.31 3260
nc -zv 172.16.3.31 3260

# WebAPI login: the response must contain "success":true
read -rsp "DSM password: " P; echo
curl -sk https://172.16.2.31:5001/webapi/auth.cgi \
  --data-urlencode "api=SYNO.API.Auth" \
  --data-urlencode "version=6" \
  --data-urlencode "method=login" \
  --data-urlencode "account=ops" \
  --data-urlencode "passwd=$P" \
  --data-urlencode "format=sid"
If the login fails with a 403 or 404-style error, 2FA is probably still being enforced for that account.
Step 2: Prepare the OpenStack nodes
Hostname mapping (deployer only)
Kolla Ansible connects to the nodes by the names in the inventory, so the deployment host must be able to resolve them. Add the management IPs of all OpenStack nodes to /etc/hosts on the deployer:
sudo tee -a /etc/hosts <<'EOF'

# OpenStack VIP
192.168.19.35   openstack-vip kolla-vip

# OpenStack controllers
192.168.19.36   dev-openstack-controller-01 controller-01
192.168.19.37   dev-openstack-controller-02 controller-02
192.168.19.38   dev-openstack-controller-03 controller-03

# OpenStack computes
192.168.19.41   dev-openstack-compute-01 compute-01
192.168.19.42   dev-openstack-compute-02 compute-02
EOF
A few notes:
- The inventory always uses the full hostname (
dev-openstack-controller-01). The short aliases (controller-01) are only for typingsshby hand. - Each node's own hostname must match the name in the inventory (
hostnamectlon the node), because RabbitMQ and Galera use it.
Check that every name resolves and that you can reach each node over SSH:
for h in dev-openstack-controller-0{1,2,3} dev-openstack-compute-0{1,2}; do
  getent hosts $h || echo "$h: NOT RESOLVED"
done

for h in dev-openstack-controller-0{1,2,3} dev-openstack-compute-0{1,2}; do
  ssh -o BatchMode=yes -o ConnectTimeout=5 $h hostname || echo "$h: SSH FAILED"
done
Each node should print its own full hostname. If one prints SSH FAILED, fix the SSH key or user first, because Kolla Ansible needs passwordless SSH to every node.
Do this on the target nodes before kolla-ansible bootstrap-servers. The deployment host does not need any of it.
Time sync (all nodes)
Galera, RabbitMQ, and Keystone tokens are sensitive to clock drift between nodes, so every node needs working time sync. I run chrony on the host and turn off Kolla's own chrony container so the two do not fight over NTP:
sudo apt install -y chrony
sudo systemctl enable --now chrony
sudo timedatectl set-timezone Asia/Jakarta
chronyc tracking
Disable the host multipathd and iscsid (all nodes)
Kolla runs iscsid and multipathd as containers on compute nodes and on the cinder-volume node. If the host's own iscsid, open-iscsi, or multipathd are also running, they fight with the containers. Disable them on every node before the first deploy:
sudo systemctl disable --now multipathd.service multipathd.socket
sudo systemctl disable --now iscsid.service iscsid.socket open-iscsi.service
I disable them on all nodes, not just the ones that run the containers today, so that moving cinder-volume to another node later does not bring the conflict back.
Also make sure each node has an IP on both storage subnets, with no gateway.
Mount the Glance NFS share (controllers only)
Do this only after the DSM side is ready (NFS service, glance shared folder, NFS permission for 172.16.2.0/24, and port 2049 open in the DSM firewall). Run it on all three controllers.
sudo apt install -y nfs-common
sudo mkdir -p /mnt/glance
Make the mount permanent in /etc/fstab:
172.16.2.31:/volume1/glance /mnt/glance nfs4 vers=4.1,_netdev,nofail,x-systemd.automount 0 0
sudo systemctl daemon-reload
sudo mount -a
sudo chmod 755 -R /mnt/glance/
df -h /mnt/glance
Test that the share is really shared: write from one controller and read from the others.
echo ok | sudo tee /mnt/glance/test.txt   # controller-01
cat /mnt/glance/test.txt                  # controller-02 and 03
sudo rm /mnt/glance/test.txt
Step 3: Deploy with Kolla Ansible
Run everything in this step on the deployment host.
Install Kolla Ansible
sudo apt update
sudo apt install -y git python3-dev libffi-dev gcc libssl-dev python3-venv

python3 -m venv openstack
source openstack/bin/activate
pip install -U pip

# 2025.1 needs ansible-core 2.16 to 2.17 (check the exact range in the 2025.1 Quick Start)
pip install 'ansible-core>=2.16,<2.18'
pip install git+https://opendev.org/openstack/kolla-ansible@stable/2025.1

sudo mkdir -p /etc/kolla
sudo chown $USER:$USER /etc/kolla
cp -r $VIRTUAL_ENV/share/kolla-ansible/etc_examples/kolla/* /etc/kolla
cp $VIRTUAL_ENV/share/kolla-ansible/ansible/inventory/multinode .

kolla-ansible install-deps
Inventory
Edit the multinode file you just copied. The groups I use:
[control]
dev-openstack-controller-01
dev-openstack-controller-02
dev-openstack-controller-03

[network]
dev-openstack-controller-01
dev-openstack-controller-02
dev-openstack-controller-03

[compute]
dev-openstack-compute-01
dev-openstack-compute-02

[monitoring]
dev-openstack-controller-01

[storage]
dev-openstack-controller-01
cinder-volume runs on the hosts in [storage]. Because the Synology driver cannot run active/active, that group gets exactly one node. Do not leave it empty: without a node there, cinder-volume is never deployed, even though the backend is not a local disk. Moving it to another node is covered in the failover section below.
Check that Ansible can reach every node before going further:
ansible -i ./multinode all -m ping
Passwords
kolla-genpwd
This fills /etc/kolla/passwords.yml. Keep that file out of git.
globals.yml
kolla_base_distro: "ubuntu"

kolla_internal_vip_address: "192.168.19.35"

neutron_plugin_agent: "ovn"
network_interface: "eth0"          # (management)
tunnel_interface: "eth1"           # (internal)
storage_interface: "eth2"          # (storage)
neutron_external_interface: "ens22" # (external)

enable_haproxy: "yes"
enable_keepalived: "yes"
keepalived_virtual_router_id: "51"

enable_cinder: "yes"
enable_horizon: "yes"

enable_iscsid: "yes"
enable_multipathd: "yes"
glance_file_datadir_volume: "/mnt/glance"
enable_cinder_backend_iscsi: "yes"
skip_cinder_backend_check: "yes"
enable_cinder_backup: "no"
The Cinder backend
Create /etc/kolla/config/cinder/cinder-volume.conf on the deployment host. Kolla copies it to the cinder-volume node.
[DEFAULT]
enabled_backends = synology

[synology]
# Fixed logical host name, so volumes are not tied to one node.
# Set it BEFORE creating the first volume.
backend_host = cinder-synology
volume_backend_name = synology
volume_driver = cinder.volume.drivers.synology.synology_iscsi.SynoISCSIDriver
target_protocol = iscsi

# Path 1: WebAPI and the main iSCSI portal
target_ip_address = 172.16.2.31
# Path 2: second iSCSI portal
target_secondary_ip_addresses = 172.16.3.31

synology_admin_port = 5001
driver_use_ssl = True
# DSM uses a self-signed certificate out of the box
synology_ssl_verify = False
driver_ssl_cert_verify = False

synology_username = <username>
synology_password = <password>
synology_pool_name = volume1

use_multipath_for_image_xfer = True

# Cache images in the backend to speed up "create volume from image"
image_volume_cache_enabled = True
image_volume_cache_max_size_gb = 100
image_volume_cache_max_count = 20
A few notes:
target_ip_addresstakes only one IP and is also used for the WebAPI calls. The second iSCSI portal goes intarget_secondary_ip_addresses. Either way, verify that both sessions really form (see the multipath check later in this post).driver_ssl_cert_verify = Falseis fine for a lab. In production, install a proper certificate on DSM and leave verification on.- The image-volume cache only becomes active after you set
cinder_internal_tenant_project_idandcinder_internal_tenant_user_id, which need Keystone to be running first. Until then it does nothing, so it is safe to leave in. - The password sits in this file in plain text. Set
chmod 600, keep it out of git, and consideransible-vaultfor the file.
Step 4: Deploy
kolla-ansible bootstrap-servers -i ./multinode
kolla-ansible prechecks -i ./multinode
kolla-ansible deploy -i ./multinode
If OpenStack is already running, apply the backend with a reconfigure instead:
kolla-ansible reconfigure -i ./multinode --tags cinder
Step 5: Create a volume type and test one volume
First, check that the cinder-volume service for the Synology backend is up:
openstack volume service list
# cinder-volume ... synology ... up
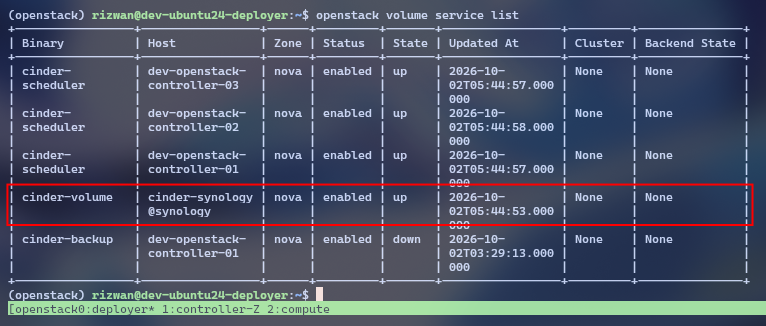
Create a volume type that points to the backend, then create a 10 GB test volume:
openstack volume type create fast
openstack volume type set fast --property volume_backend_name=synology

openstack volume create --size 10 --type fast test-vol
openstack volume list
openstack volume show test-vol -c status -c os-vol-host-attr:host
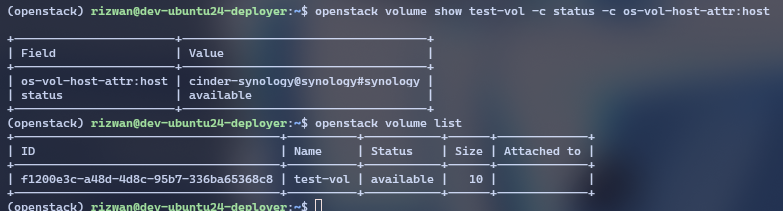
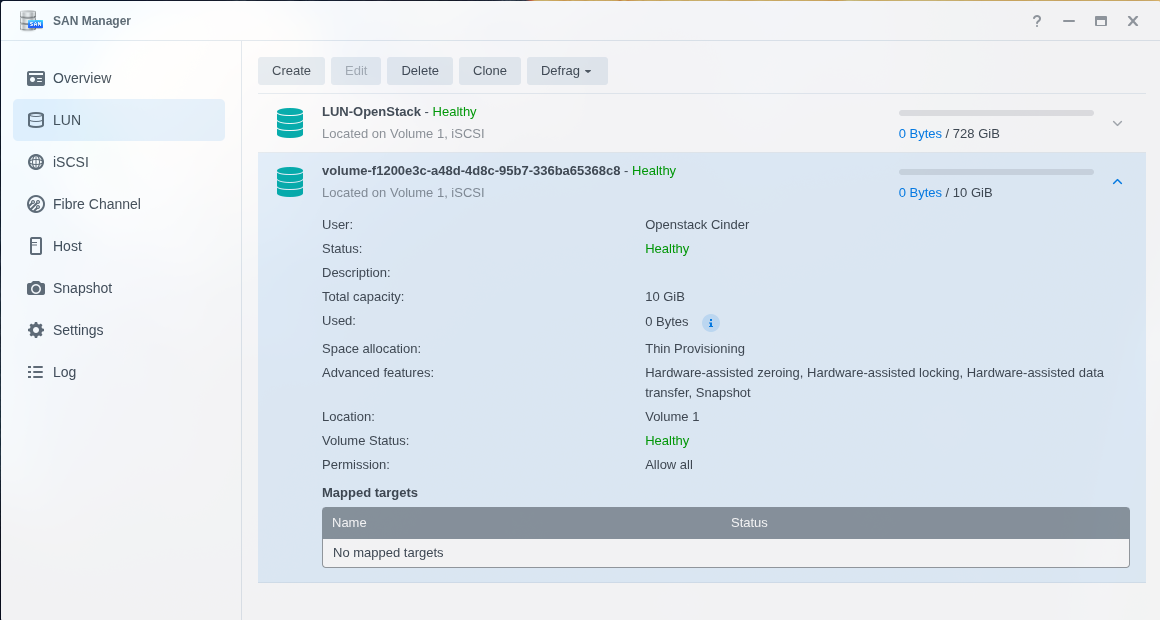
The status should become available. In DSM, SAN Manager should now show a new LUN and a target whose name starts with Cinder-Target-.
 If the status goes to
 error, look at the Cinder log on the cinder-volume node:
sudo docker logs cinder_volume
Login failures, 2FA problems, and API-version differences on DSM 7 all show up there.
Step 6: Prepare OpenStack
Everything in this step runs with the admin credentials loaded (source /etc/kolla/admin-openrc.sh).
Security group
A minimal group that allows SSH, HTTP, and ping from anywhere. Outbound traffic is allowed by the default egress rules that every new group gets.
openstack security group create minimum --description "ssh, http, icmp inbound; all outbound"

openstack security group rule create --ingress --protocol tcp --dst-port 22 --remote-ip 0.0.0.0/0 minimum
openstack security group rule create --ingress --protocol tcp --dst-port 80 --remote-ip 0.0.0.0/0 minimum
openstack security group rule create --ingress --protocol icmp --remote-ip 0.0.0.0/0 minimum
Images
Download a few cloud images and upload them to Glance. With the NFS setup from Step 2, the uploaded files end up on the DSM share.
mkdir -p ~/images && cd ~/images

wget https://cloud-images.ubuntu.com/noble/current/noble-server-cloudimg-amd64.img
wget https://cloud-images.ubuntu.com/jammy/current/jammy-server-cloudimg-amd64.img
wget https://dl.rockylinux.org/pub/rocky/9/images/x86_64/Rocky-9-GenericCloud-Base.latest.x86_64.qcow2

openstack image create ubuntu-24.04 \
  --file noble-server-cloudimg-amd64.img \
  --disk-format qcow2 --container-format bare --public \
  --property os_distro=ubuntu --property os_version=24.04

openstack image create ubuntu-22.04 \
  --file jammy-server-cloudimg-amd64.img \
  --disk-format qcow2 --container-format bare --public \
  --property os_distro=ubuntu --property os_version=22.04

openstack image create rocky-9 \
  --file Rocky-9-GenericCloud-Base.latest.x86_64.qcow2 \
  --disk-format qcow2 --container-format bare --public \
  --property os_distro=rocky --property os_version=9
Flavors
openstack flavor create --vcpus 2 --ram 4096 --disk 20 --public c2r4d20
openstack flavor create --vcpus 1 --ram 2048 --disk 10 --public c1r2d10
Networks
An external network for floating IPs, a tenant network for instances, and a router between them.
# external network + subnet (flat, on the external NIC)
openstack network create ext-net \
  --external --provider-network-type flat --provider-physical-network physnet1

openstack subnet create ext-sub \
  --network ext-net --subnet-range 192.168.19.0/24 \
  --gateway 192.168.19.1 --no-dhcp \
  --allocation-pool start=192.168.19.51,end=192.168.19.71

# tenant network + subnet
openstack network create lab-ops-net

openstack subnet create lab-ops-sub \
  --network lab-ops-net --subnet-range 10.10.10.0/24 \
  --gateway 10.10.10.1

# router: gateway to ext-net, interface to lab-ops-sub
openstack router create ops-router
openstack router set ops-router --external-gateway ext-net
openstack router add subnet ops-router lab-ops-sub
Keypair
Create a keypair and save the private key on the deployer:
openstack keypair create --private-key ~/.ssh/labops labops
chmod 600 ~/.ssh/labops
The floating IP pool (192.168.19.51 to .71) shares the management subnet in this lab, so pick a range that no node or DSM address uses. With ML2/OVN there is no --ha flag for routers: HA comes from the gateway chassis on the three controllers (with BFD), and the router fails over by itself.
Step 7: Boot an instance from a volume
By default, a Nova instance's root disk is ephemeral and stored on the compute node, not on Synology. To really put the disk on Synology, boot from a volume.
Boot the instance
Create the root volume from the image on the fast type first, so it is guaranteed to land on the Synology backend, then boot from it:
openstack volume create --size 20 --type fast --image ubuntu-24.04 --bootable vol-root-ops-lab-ubuntu24

openstack server create --flavor c2r4d20 \
  --volume vol-root-ops-lab-ubuntu24 \
  --network lab-ops-net \
  --security-group minimum \
  --key-name labops \
  ins-ops-lab-ubuntu24
Wait until the volume is available before booting, and until the server is ACTIVE before the next step:
openstack volume show vol-root-ops-lab-ubuntu24 -c status
openstack server show ins-ops-lab-ubuntu24 -c status -c addresses
Floating IP and login
The instance only has an address on lab-ops-net (10.10.10.0/24). Give it a floating IP from ext-net to reach it from your LAN:
openstack floating ip create ext-net
openstack server add floating ip ins-ops-lab-ubuntu24 <floating-ip>

ssh -i ~/.ssh/labops ubuntu@<floating-ip>
Extra data volume
openstack volume create --size 10 --type fast vol-data01-ops-lab-ubuntu24
openstack server add volume ins-ops-lab-ubuntu24 vol-data01-ops-lab-ubuntu24
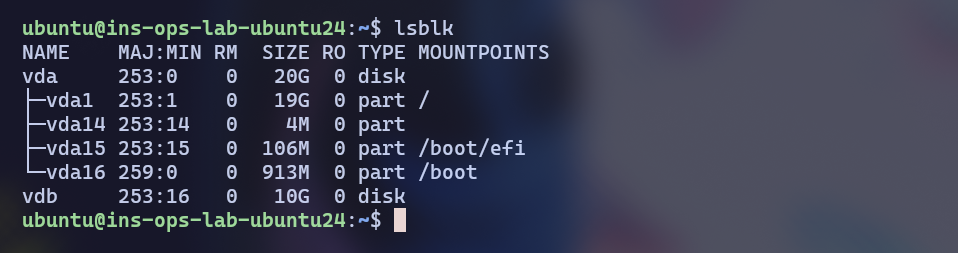
Inside the guest, lsblk should show the 20 GB root disk and the 10 GB data disk.
--boot-from-volume 20 is the shortcut, but it creates the root volume with the default volume type and gives you no way to choose another. With one Cinder backend this makes no difference, but creating the volume yourself with --type fast keeps working if you add a second backend later.
Step 8: Verify the two iSCSI paths
On the compute node that runs the instance:
sudo docker exec iscsid iscsiadm -m session
# expect two sessions: 172.16.2.31:3260 and 172.16.3.31:3260

sudo docker exec multipathd multipath -ll
# expect one device with two paths, both active/ready
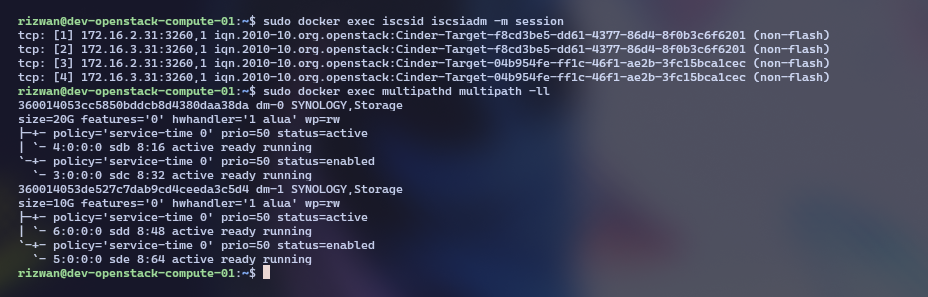
Because the config only knows one target_ip_address, the second session depends on iSCSI discovery: the initiator asks the first portal which portals exist, and DSM advertises both, provided the target listens on both NICs. I treat this as something to verify, not assume. If you only see one session, check that the target is not bound to a single interface, and that port 3260 is open on the second subnet.
Then test the failover. Take one storage interface down on the compute node and keep writing to the volume inside the guest:
sudo ip link set <storage-nic-1> down
sudo docker exec multipathd multipath -ll   # one path failed, one active
sudo ip link set <storage-nic-1> up
I/O in the guest should keep working, possibly after a short stall while multipath switches paths. If the guest freezes instead, the second session most likely never formed. Repeat with the second NIC. By default DM-multipath uses a failover policy (one active path, one standby). Set path_grouping_policy multibus in multipath.conf if you want both paths in use at the same time.
What happens when something fails
| Failure | Result |
|---|---|
| One storage path goes down | I/O continues over the other path. |
cinder-volume node goes down | You cannot create, delete, or resize volumes. Attached volumes keep working, because the instance talks to DSM directly. |
| DSM goes down | All volumes lose their I/O. Guests freeze or remount read-only. After DSM is back, iSCSI sessions reconnect. Reboot guests that went read-only. |
| DSM is up, API unreachable | New volumes cannot be created. Existing ones are fine. |
Moving cinder-volume to another node
Cinder-volume runs as a single active instance (active/passive). Without a DLM
and a driver that supports active/active, running several instances against the
same backend_host is not formally safe, so failover is manual and the RTO
depends on the operator.
Prerequisites (set up once)
- Use a fixed logical host name in the backend section before creating the first volume, so volumes are not tied to a node name:
[synology]
backend_host = cinder-synology
If volumes already exist under a node-specific host name, check their
current host (openstack volume show <id> -c os-vol-host-attr:host, admin
only) and move them once:
sudo docker exec cinder_api cinder-manage volume update_host \
  --currenthost <old-node>@synology#<pool> \
  --newhost cinder-synology@synology#<pool>
- Every candidate node must reach both iSCSI portals (172.16.2.31, 172.16.3.31) over the storage interface and the Synology DSM API (port 5001).
Failover procedure
- Make sure the old node is really stopped or isolated. Two
cinder-volumeinstances running at the same time is unsafe. - In the inventory, remove the old node from
[storage]and add the new one. - Refresh facts, then deploy only to the new node:
kolla-ansible gather-facts -i ./multinode
kolla-ansible deploy -i ./multinode --tags cinder,iscsi --limit <new-node>
If gather-facts fails because the dead node is unreachable, temporarily
remove it from the inventory or limit the facts to the remaining hosts.
4. Verify:
openstack volume service list      # cinder-synology@synology must be up
openstack volume create --size 1 failover-test
- Volumes stuck in
creating,attachingordeletingfrom before the failure are not recovered automatically. Reset them and retry:
openstack volume set --state available <id> # or: cinder reset-state
When the old node returns
Deploy does not stop containers on hosts outside [storage]. Before bringing
the node back online (or immediately after, if it auto-starts), remove the
stale container so it does not run next to the new one:
sudo docker rm -f cinder_volume
Scope of the failure
Only the control path for volumes (create, attach, detach, delete) is interrupted. Running instances keep their I/O because the data path goes directly from the compute node to the Synology over multipath iSCSI.
If the Synology driver does not work
The driver is the part most likely to give trouble on newer DSM versions. If it does, there is a fallback that keeps the same hardware: create one big LUN manually in DSM, log in to both portals from the cinder node with iscsiadm, let multipath merge them into one device, build an LVM volume group named cinder-volumes on it, and use Kolla's regular LVM backend (enable_cinder_backend_lvm and enable_cinder_backend_iscsi). Cinder then slices volumes inside LVM, and DSM is just a big disk. You lose Synology's native snapshots and clones, but it is the most predictable path.
Troubleshooting
| Symptom | Likely cause |
|---|---|
| Precheck: "Please enable at least one backend" | Add skip_cinder_backend_check: "yes" to globals.yml. |
Volume goes to error immediately | Read docker logs cinder_volume. Common causes: wrong password, the account is not in administrators, 2FA still enforced. |
| SSL certificate errors in the log | DSM has a self-signed cert. Set driver_ssl_cert_verify = False or install a trusted cert. |
cinder-volume is not deployed at all | [storage] is empty in the inventory. |
| Only one iSCSI session | The target is bound to one NIC, or port 3260 is blocked on the second subnet. |
| Attach fails or no multipath device | A host-level iscsid or multipathd is still running. Disable it and confirm the containers are up. |
Wrap up
Cinder plus a Synology box is a pleasant way to learn the full block-storage flow: WebAPI calls to create LUNs, iSCSI logins from compute nodes, multipath on two paths, and boot-from-volume. It is not a high-availability storage design, because DSM and the single cinder-volume node are both single points of failure. Treat it as a lab and learning setup, and when you need real storage HA, move to Ceph.